

| 일 | 월 | 화 | 수 | 목 | 금 | 토 |
|---|---|---|---|---|---|---|
| 1 | 2 | 3 | 4 | 5 | ||
| 6 | 7 | 8 | 9 | 10 | 11 | 12 |
| 13 | 14 | 15 | 16 | 17 | 18 | 19 |
| 20 | 21 | 22 | 23 | 24 | 25 | 26 |
| 27 | 28 | 29 | 30 |
- tomcat
- LOL
- 회원가입
- SQL
- k8s
- 다국어처리
- MSI
- NoSQL
- 데이터베이스
- Spring
- Java
- 쿠버네티스
- 롤토체스
- 자바스크립트
- Database
- 테이블
- jQuery
- 마이바티스
- 리그오브레전드
- 롤토체스 꿀팁
- 이메일인증
- 롤
- 일프로
- jdk
- 쿠버네티스 어나더 클래스
- 스프링
- 파이썬
- Python
- oracle
- kubernetes
- Today
- Total
웹쟁이의 일상
[Kubernetes] 쿠버네티스가 편한 이유 본문
◎실제 프로젝트를 할 때 구조적인 문제(모니터링/로깅)
- 개발과 모니터링 시스템이 서로 엮일 수 밖에 없는 구조
- 개발에서는 한번도 써보지 않은 모니터링 시스템을 만드는 구조
- 오픈 시 개발 프로젝트와 서로 다른 범위의 App들을 모니터링 하게 되는 구조
=> 쿠버네티스 생태계에 있는 모니터링/로깅 툴을 사용하면 손쉽게 문제 해결
◎ 모니터링 툴 다운로드
1. Github(k8s-1pro)에서 Prometheus(with Grafana), Loki-Stack yaml 다운로드
[root@k8s-master ~]# yum -y install git

# 로컬 저장소 생성
git init monitoring
git config --global init.defaultBranch main
cd monitoring

# remote 추가 ([root@k8s-master monitoring]#)
git remote add -f origin https://github.com/k8s-1pro/install.git

# sparse checkout 설정
git config core.sparseCheckout true
echo "ground/k8s-1.27/prometheus-2.44.0" >> .git/info/sparse-checkout
echo "ground/k8s-1.27/loki-stack-2.6.1" >> .git/info/sparse-checkout

# 다운로드
git pull origin main
2. Prometheus(with Grafana) 설치
# 설치 ([root@k8s-master monitoring]#)
kubectl apply --server-side -f ground/k8s-1.27/prometheus-2.44.0/manifests/setup
kubectl wait --for condition=Established --all CustomResourceDefinition --namespace=monitoring
kubectl apply -f ground/k8s-1.27/prometheus-2.44.0/manifests

# 설치 확인 ([root@k8s-master]#)
kubectl get pods -n monitoring
3.Loki-Stack 설치
# 설치 ([root@k8s-master monitoring]#)
kubectl apply -f ground/k8s-1.27/loki-stack-2.6.1

# 설치 확인
kubectl get pods -n loki-stack

- 처음 설치 후 pod들이 ContainerCreating 상태에서 무한대기가 걸리는 문제가 발생.

- 확인해보니 Calico 네트워크 플러그인에 권한 문제가 있어 네트워크를 설정할 수 없어 발생하는 문제였다.ㅊ
- 아래 명령어로 Calico RBAC 권한을 확인하고 수정하니 정상 동작.
# Calico 사용자에게 필요한 권한을 부여
kubectl create clusterrolebinding calico-access --clusterrole=cluster-admin --serviceaccount=calico-system:calico-node

# 또는 특정 네임스페이스에 권한 부여
kubectl create clusterrolebinding monitoring-calico --clusterrole=cluster-admin --serviceaccount=monitoring:default
kubectl create clusterrolebinding loki-calico --clusterrole=cluster-admin --serviceaccount=loki-stack:default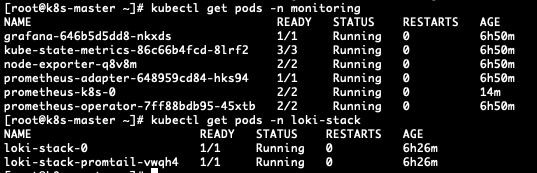
- 설치된 pod들이 Running 상태인지 확인
- Running으로 정상동작한다면 리눅스 서버 생성 시만든 [ipv4주소:30001] Grafana로 접속한다.
http://192.168.64.10:30001
- ID : admin
- PW : admin
위 정보로 로그인하면 비밀번호 수정 페이지가 나온다. 원하는 비밀번호 입력 후 로그인.

- 로그인 후 왼쪽 상단 햄버거 버튼을 누르고 Connections로 이동

- loki를 검색 후 아래 나오는 Loki를 클릭해준다.

- Create a Loki data source를 클릭

- HTTP > URL에 아래 url을 입력 후 아래 Save & test 클릭.
http://loki-stack.loki-stack:3100
삭제를 하려면 아래 명령어를 입력한다.
[root@k8s-master ~]# cd monitoring

# Prometheus 삭제
kubectl delete --ignore-not-found=true -f ground/k8s-1.27/prometheus-2.44.0/manifests -f ground/k8s-1.27/prometheus-2.44.0/manifests/setup

# Loki-stack 삭제
kubectl delete -f ground/k8s-1.27/loki-stack-2.6.1
◎ 배포환경 구성하기
- 쿠버네티스 dashboard로 이동
https://192.168.64.10:30000/

- namespace를 default로 변경 후 오른쪽 상단 +버튼을 클릭하면 yaml or json 입력 폼이 나온다.
- 아래 내용을 입력 후 업로드.
apiVersion: apps/v1
kind: Deployment
metadata:
  name: app-1-2-2-1
spec:
  selector:
    matchLabels:
      app: '1.2.2.1'
  replicas: 2
  strategy:
    type: RollingUpdate
  template:
    metadata:
      labels:
        app: '1.2.2.1'
    spec:
      containers:
        - name: app-1-2-2-1
          image: 1pro/app
          imagePullPolicy: Always
          ports:
            - name: http
              containerPort: 8080
          startupProbe:
            httpGet:
              path: "/ready"
              port: http
            failureThreshold: 20
          livenessProbe:
            httpGet:
              path: "/ready"
              port: http
          readinessProbe:
            httpGet:
              path: "/ready"
              port: http
          resources:
            requests:
              memory: "100Mi"
              cpu: "100m"
            limits:
              memory: "200Mi"
              cpu: "200m"
---
apiVersion: v1
kind: Service
metadata:
  name: app-1-2-2-1
spec:
  selector:
    app: '1.2.2.1'
  ports:
    - port: 8080
      targetPort: 8080
      nodePort: 31221
  type: NodePort
---
apiVersion: autoscaling/v2
kind: HorizontalPodAutoscaler
metadata:
  name: app-1-2-2-1
spec:
  scaleTargetRef:
    apiVersion: apps/v1
    kind: Deployment
    name: app-1-2-2-1
  minReplicas: 2
  maxReplicas: 4
  metrics:
    - type: Resource
      resource:
        name: cpu
        target:
          type: Utilization
          averageUtilization: 40

- pod 가 ContainerCreating 되고 있는 모습. 생성이 끝나면 Running으로 바뀐다.

◎ 배포환경 테스트
1. App에 지속적으로 트래픽 보내기
[root@k8s-master ~]# while true; do curl http://192.168.64.10:31221/hostname; sleep 2; echo ''; done;
2. App에 Memory Leak 나게 하기 (self-healing 테스트)
[root@k8s-master ~]# curl 192.168.64.10:31221/memory-leak
3. App에 부하주기
[root@k8s-master ~]# curl 192.168.64.10:31221/cpu-load

- 부하를 막기 위해 pod가 4개(maxReplica를 4로 설정해서 최대 4개)로 늘었다.
4. App 이미지 업데이트
> namespace: default > 디플로이먼트 > 편집 클릭

- 아래 내용 작성 후 업데이트
spec:
      containers:
        - name: app-1-2-2-1
          image: 1pro/app-update  # 수정
- 명령어로 할 경우
[root@k8s-master ~]# kubectl set image -n default deployment/app-1-2-2-1 app-1-2-2-1=1pro/app-update
- 이미지 업데이트중.
5. 기동되지 않는 App 업데이트
- 디플로이먼트 > 편집 후 위 내용으로 변경
spec:
      containers:
        - name: app-1-2-2-1
          image: 1pro/app-error   # 수정
- cli 명령어로 할 경우
[root@k8s-master ~]# kubectl set image -n default deployment/app-1-2-2-1 app-1-2-2-1=1pro/app-error
6. 배포한 Object 삭제
[root@k8s-master ~]# kubectl delete -n default deploy app-1-2-2-1
[root@k8s-master ~]# kubectl delete -n default svc app-1-2-2-1
[root@k8s-master ~]# kubectl delete -n default hpa app-1-2-2-1
'k8s' 카테고리의 다른 글
| [Kubernetes] Object 그려보며 이해하기 (0) | 2025.04.07 |
|---|---|
| [Kubernetes] 쿠버네티스 빠르고 쉽게 설치하기(Silicon Mac) (0) | 2025.04.04 |
| [Kubernetes] 컨테이너 한방 정리 (1) | 2025.04.04 |

