Notice
Recent Posts
Recent Comments
Link
| 일 | 월 | 화 | 수 | 목 | 금 | 토 |
|---|---|---|---|---|---|---|
| 1 | 2 | 3 | 4 | 5 | ||
| 6 | 7 | 8 | 9 | 10 | 11 | 12 |
| 13 | 14 | 15 | 16 | 17 | 18 | 19 |
| 20 | 21 | 22 | 23 | 24 | 25 | 26 |
| 27 | 28 | 29 | 30 | 31 |
Tags
- MSI
- Spring
- 파이썬
- 쿠버네티스
- 쿠버네티스 어나더 클래스
- Java
- 스프링
- NoSQL
- 리그오브레전드
- 마이바티스
- 데이터베이스
- tomcat
- 다국어처리
- 자바스크립트
- SQL
- 롤토체스 꿀팁
- kubernetes
- jQuery
- 롤
- Python
- 일프로
- 이메일인증
- k8s
- oracle
- 롤토체스
- jdk
- Database
- LOL
- 테이블
- 회원가입
Archives
- Today
- Total
웹쟁이의 일상
[Spring] 다국어 처리 방법 본문
안녕하세요~! 오늘은 스프링에서 다국어 처리를 하는 방법을 알아보겠습니다.
<section class="panel">
<form:form commandName="${commandName}" name="frm" cssClass="panel-body" method="post">
<header class="text-left createHeader">기본정보입력
<span class="subCreateHeader">기본정보를 정확히 입력해주세요</span>
</header>
<div class="form-group">
<span class="star">*</span>
<label class="control-label idCheck" style="float: left;"><spring:message code="messageVo.idLabel" /></label>
<form:errors cssClass="idSuccess" style="color:red; font-size :10px; margin-top:5px; margin-left:5px; width:235px; float:left" path="userId" />
<div class="createIdSpan" id="createIdSpan"></div>
<form:input type="text" path="userId" cssClass="form-control" maxlength="20" onKeyup="checkedId(this);" onblur="onblur_event();" autocomplete="off" />
</div>
<div class="form-group">
<span class="star">*</span>
<label class="control-label nameCheck" style="float: left;"><spring:message code="messageVo.nameLabel" /></label>
<form:input type="text" path="userNm" placeholder="이름을 입력하세요" cssClass="form-control" maxlength="20" autocomplete="off" />
</div>
<div class="form-group auth">
<span class="star">*</span>
<label class="control-label emailCheck" style="float: left;"><spring:message code="messageVo.emailLabel" /></label>
<form:errors cssClass="emailSuccess" style="color:red; font-size :10px; margin-top:5px; margin-left:5px; width:250px; float:left" path="userEmail" />
<div class="createEmailSpan" id="createEmailSpan"></div>
<form:input type="email" path="userEmail" placeholder="example@example.com" cssClass="form-control emailInput" maxlength="30" autocomplete="off" />
<button type="button" class="btn btn-info emailBtn" id="emailBtn">인증번호 전송</button>
</div>
<div class="form-group">
<label class="control-label"><spring:message code="messageVo.passwordLabel" /></label>
<form:password path="userPw" placeholder="Password" maxlength="16" cssClass="form-control" onblur="onblur_passwordCheck();" autocomplete="off"/>
</div>
<div class="form-group">
<label class="control-label passwordCheck"><spring:message code="messageVo.passwordLabel2" /></label>
<input type="password" id="userPw2" placeholder="Password 재확인" maxlength="16" class="form-control" onblur="onblur_passwordCheck();" autocomplete="off"/>
</div>
<div class="form-group">
<label class="control-label labelAddr"><spring:message code="messageVo.addrLabel" /></label>
<div>
<form:input cssClass="form-control zipCode" path="userZipCode" placeholder="클릭 후 검색" onclick="openDaumPostcode('userZipCode','userFirstAddr','userSecondAddr'); return false;" readonly="true" />
<form:input cssClass="form-control userFirstAddr" path="userFirstAddr" readonly="true" />
<form:input cssClass="form-control userSecondAddr" path="userSecondAddr" />
</div>
<div id="layer" style="display: none; position: fixed; overflow: hidden; z-index: 1; -webkit-overflow-scrolling: touch;">
<img src="//t1.daumcdn.net/localimg/localimages/07/postcode/320/close.png" id="btnCloseLayer" style="cursor: pointer; position: absolute; right: -3px; top: -3px; z-index: 1" onclick="closeDaumPostcode()" alt="닫기 버튼">
</div>
</div>
<div class="btnDiv">
<button type="button" class="btn btn-info" id="create" data-toggle="tooltip" data-placement="bottom" data-original-title="회원가입">회원 가입</button>
<button type="button" class="btn" id="formReset" data-toggle="tooltip" data-placement="bottom" data-original-title="양식 초기화">
<spring:message code="messageVo.messageReset" />
</button>
</div>
</form:form>
<input type="hidden" path="random" id="random" value="${random }" />
</section>위의 코드는 회원가입 폼을 만들기 위해 작성한 HTML 코드입니다.
그런데 평소 보던 html태그에 <spring:message> 라던지 <form:form>이라던지 약간은 생소한 태그들이 보입니다.
form태그와 spring 태그는 저번 포스팅에서 header 세팅을 하면서
<%@ taglib prefix="spring" uri="http://www.springframework.org/tags" %>
<%@ taglib prefix="form" uri="http://www.springframework.org/tags/form" %>
이렇게 추가를 해줬구요, spring message태그에 대해 알아보겠습니다.
기본적으로 spring:message 태그는 다국어 처리를 위해서 만들어 주었습니다.

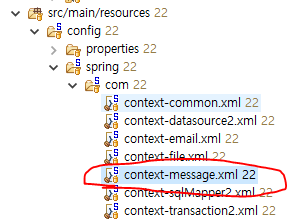
일단 src/main/resources -> config -> spring폴더에 context-message.xml 파일을 만들어 줍니다.
<bean id="messageSource" class="org.springframework.context.support.ResourceBundleMessageSource">
	<property name="basenames">
		<list>
			<!-- message-common_언어.properties 파일을 찾는다 -->
			<value>locale/messages/message-common</value>
		</list>
	</property>
</bean>
그리고 위의 코드를 입력해 줍니다. 아래 만들어준 message-common_xx형식의 파일을 찾기 위함입니다.

그림과 같이 properties파일들을 만들어 줍니다.
#user
messageVo.messageId = Please enter your ID!!
messageVo.messageReset = Reset
messageVo.messageDelete = Withdrawal
messageVo.count = {0} message , {1} message
messageVo.prev = prev
messageVo.next = next
messageVo.idLabel = ID
messageVo.nameLabel = Name
messageVo.emailLabel = E-mail
messageVo.passwordLabel = Password
messageVo.passwordLabel2 = Password confirm
messageVo.addrLabel = Address
messageVo.nameHolder = Please enter your name
NotEmpty.userVo.userId = ID Why not?
영어만 올리겠습니다. 나머지는 번역해서 만들면 되겠습니다.
여기까지 설정 해주시고 저장한뒤 url 뒤에 ?lang=en을 붙이면 영어버전으로 실행이 되는 걸 확인할 수 있습니다.


각각 영어, 한글, 일어 버전입니다. 간간히 한글이 섞여 있는 것은 귀찮아서 조금 덜 입력했기 때문입니다..
여기까지 다국어 설정을 알아 보았습니다.
'JAVA' 카테고리의 다른 글
| [Spring] 회원가입 구현하기 - 2 (0) | 2019.05.21 |
|---|---|
| [Spring] 회원가입 구현하기 -1 (2) | 2019.05.20 |
| [Spring] JSP header 세팅 (0) | 2019.05.18 |
| [Spring] 마이바티스 연동하기 (0) | 2019.05.16 |
| [Spring] 이메일 발송 및 인증 방법 (5) | 2019.05.09 |
Comments


